Wednesday, 20 February 2013


Monday, 18 February 2013
The OLE DB provider "Microsoft.ACE.OLEDB.12.0" has not been registered
Solutions 1: "Data Connectivity Components for 2007 office system Driver".
after you download, please restart your server.

you can Click Microsoft Link.
Tuesday, 12 February 2013
How to create Setup File in C# 2008 (windows Application)
How to create Setup File in C# 2008 (windows Application)
Rich Text Format (RTF) use All Programs ==> Accessories ==> Wordpad
How to run an installed file after installation?
Step 1:
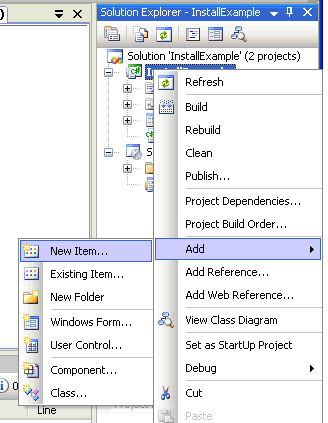
Step 2: Name it Installer Class.

Step 3:

Step 4:
Rebuild your install solution.
Download Process steps (Pdf Format -> 21.5 MB)
Rich Text Format (RTF) use All Programs ==> Accessories ==> Wordpad
How to run an installed file after installation?
Step 1:
Step 2: Name it Installer Class.
Step 3:
Step 4:
Rebuild your install solution.
Download Process steps (Pdf Format -> 21.5 MB)

Monday, 4 February 2013
Creating C# Class Library (DLL) Using Visual Studio .NET
Part 1: Creating a
Class Library (DLL)
Create an Empty Class Library Project Select File->New->Project->Visual C#
Projects->Class Library. Select your project name and appropriate
directory using Browse button and click OK.
See Figure 1.

Figure 1.
Project and Its files
The Solution Explorer adds two C# classes to your project.
First is AssemblyInfo.cs and second is Class1.cs. We don't care about AssemblyInfo. We will be
concentrating on Class1.cs.
See Figure 2.

The NewDLL
Namespace
When you double click on Class1.cs, you see a namespace NewDLL. We will be referencing this
namespace in our clients to access this class library.
using System;
using
System.Collections.Generic;
using
System.Linq;
using
System.Text;
namespace NEWDLL
{
public class Class1
{
}
}
Adding Methods
namespace NEWDLL
{
public class Class1
{
public static int add(int value1,
int value2)
{
int c =
value1 + value2;
return c;
}
public static int sub(int value1,
int value2)
{
int c = value1 - value2;
return c;
}
}
}
|
Build the DLL

Figure 3
Calling methods and properties of a DLL from a C# client is also an easy task. Just follow these few simple steps and see how easy is to create and use a DLL in C#.
Create a Console Application Select File->New->Project->Visual C# Projects-> Windows Forms Application. I will test my DLL from this console application. See Figure 4.

Add Reference of the Namespace
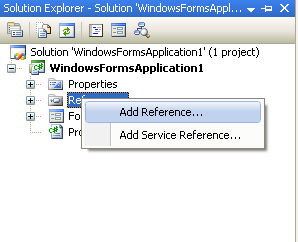
Figure 5.
Now on this page, click Browse button to browse your
library. See Figure 6.

After adding reference to NewDLL library, you can see it as an available namespace references. See Figure 7

You are only one step away to call
methods and properties of your component. You follow these steps:
1. Use namespace
Add using NEWDLL in
the beginning for your project.
using NEWDLL;

Add Code
private void button1_Click(object
sender, EventArgs e)
{
int
value1=Convert.ToInt32(textBox1.Text);
int
value2=Convert.ToInt32(textBox2.Text);
int result
= NEWDLL.Class1.add(value1, value2);
textBox3.Text = result.ToString();
}
private void button2_Click(object
sender, EventArgs e)
{
int
value1 = Convert.ToInt32(textBox1.Text);
int
value2 = Convert.ToInt32(textBox2.Text);
int
result = NEWDLL.Class1.sub(value1, value2);
textBox3.Text = result.ToString();
}
Form Design / Full Code:

using System;
using System.Collections.Generic;
using System.ComponentModel;
using System.Data;
using System.Drawing;
using System.Linq;
using System.Text;
using System.Windows.Forms;
using NEWDLL;
namespace WindowsFormsApplication1
{
public partial class Form1 : Form
{
public Form1()
{
InitializeComponent();
}
private void button1_Click(object sender, EventArgs e)
{
int value1=Convert.ToInt32(textBox1.Text);
int value2=Convert.ToInt32(textBox2.Text);
int result = NEWDLL.Class1.add(value1, value2);
textBox3.Text = result.ToString();
}
private void button2_Click(object sender, EventArgs e)
{
int value1 = Convert.ToInt32(textBox1.Text);
int value2 = Convert.ToInt32(textBox2.Text);
int result = NEWDLL.Class1.sub(value1, value2);
textBox3.Text = result.ToString();
}
}
}
Subscribe to:
Posts (Atom)